|
Have you ever attended an indoor cycling class where someone was wearing a wig, or a tiara, or even a cape? Well, I have and I encouraged it! Yes folks, it's that time of year again when adults get to play dress up, at least in my classes, and we play Thriller by MJ for the whole class! What will you do with your class this year? Here's one idea (want more ideas? Check out my previous posts here and here on Halloween games) using homemade Trick or Treat cards. This is an easy way to incorporate “tricks” (i.e., challenging drills) and “treats” (i.e., easier drills). Simply have participants pick a card, either trick or treat, and the predetermined drill assigned to that card will dictate what drill is performed. I’ve decided to have six possible tricks and three possible treats. Possible Tricks: 1. Two minutes of jumps with 30 second break; repeat two to three times 2. Two one minute standing hill climbs and a couple two minute standing hill climbs; 15 second recovery between each climb 3. Five one minute sprints with 30 seconds recovery between each sprint 4. 15 squats off the bike followed by one minute of seated hill climb; repeat two times (be watchful of participants’ footwear particularly if they are wearing cycling cleats) 5. 10 sprints for 15 seconds. Recover for 45 seconds. 6. Attack the pack power! Six intervals of seated power for 30 seconds, recover for 30 seconds Possible Treats: 1. Standing jog/ride for two minutes 2. Meet your neighbor spin out. Participants discuss best and worst Halloween costume they ever wore for three minutes. 3. Steady time trial pace for six minutes singing to the song everyone knows the words to, Thriller (the album version is 5:58) After you've constructed your family’s costumes and your Halloween decorations, it's easy to whip up these trick or treat cards. Here's how I did it: Step one: collect crafty items such orange post-it notes, black card stock, "trick" (6) and "treat" (3) labels, and fun Halloween pictures or stickers. 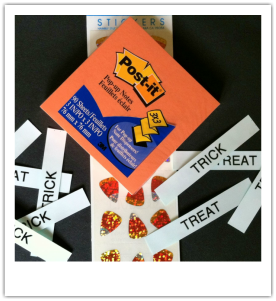
1 Comment
Scanning the internet, books and previous conference notes, reminds me of the many options on setting up indoor cycling bikes for a class. I was working on my PowerPoint slides for the AFLCA cycle designation course I taught today and wanted to dive deeper into the nuts and bolts of set-up. I came across this YouTube video, produce by Star Trac, the bike company that I typically use when I teach. It is very comprehensive and covers the majority of the points needed to set-up the bike. As a quick review, here are some key points:  Saddle Height: A crude estimate can be determined by lining up the saddle with hip bone (top of the iliac crest) or the crease of the flexed hip. I usually have participants sit in the saddle and complete a few revolutions while watching if the hips are rocking excessively. When the foot is extended the knee should be slightly bent, which really means the knee angle is approximately 25-35 degrees. Using a goniometer to measure this angle can be very helpful. Handle Bar Height: As I mentioned in a previous post, hamstring flexibility can help set the handle bar height. Have participants lean forward to the handle bars and set the height at a 45 degree angle from their hips. Beginners are looking for comfort so usually I have them place handle bars at the same height as the saddle. Whereas your experienced or more flexible riders will likely prefer a lower setting for height. Saddle Forward (fore) or Back (aft): Setting this position helps determine the placement of the knee over the pedal. This is where I find there are varying ideas of how to set up the ideal position. If the goal is efficiency and maximal force transfer from the foot to the pedal, participants will want to have the knee positioned directly above the pedal axel. By using a plumb line, there are two current thoughts on what to do: 1. Use a plumb line from superolateral patella/knee to the pedal axel, or 2. use a plumb line from mid-line of patella/knee to line up with the end of the crank arm. To determine the position with either option, look at participant’s leg and imagine a straight line from the knee to pedal axel. If the plumb line is forward (/) over the pedal axel (option 1) or end of crank arm (option 2), the seat needs to be moved backward. Conversely, if the line is backward (\) from the pedal axel (option 1) or end of crank arm (option 2), the seat needs to be moved forward. Handle Bar Forward (fore) or Back (aft): Position will vary due to different torso lengths of participants. By a visual assessment, determine if participant is too far forward to reach the handle bars or too cramped (i.e., elbows hugging body) in their body position. Participants will typically self select the position for comfort. Final Assessment: After all four (or three depending on the bike) variables are set, re-check angle at the knee with goniometer and take long plumb line string and draw a straight line from the hip to the crank to the axel. If there is alignment with all three points on the participant’s body, they are set to ride! For other reviews and/or suggestions on bike set-up, here is a sample of other recommended YouTube videos!  I wait every two years for the AFLCA's Fit Rendezvous in Edmonton. Nothing beats the energy of over 500 fitness leaders and trainers getting together to share their love and passion for group fitness. My conference started on the Friday night with the AFLCA trainers’ session on leadership. A future blog post will focus on some of its content but for this post I'd like to reflect on the indoor cycling sessions I attended. To save my legs and let's be honest, my backside, I didn't attend all the indoor cycling sessions, but I'd like to share with you what wisdom I took from the best of the best in indoor cycling instruction!
Effective Pedaling - Suzette O'Byrne The Competitive Team Ride: Indoor Team Training - Krista Popowych Ride One, Get One Free - Helen Vanderburg The Cyclist’s Toolbox: Tools and Techniques to Enhance the Indoor Ride - Suzette O'Byrne 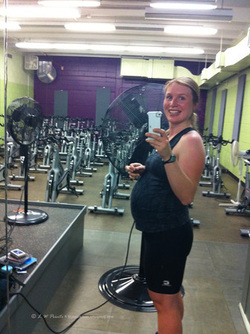 Over the 40 weeks of my pregnancy, I diligently read about what was happening to my body and my baby week to week. As in all the books I read, pregnancy was always defined through the three trimesters. The first trimester is full of excitement and anticipation for what's to come (e.g., is it a boy or a girl?, when will I begin to show?). Sounds similar to a warm-up in an indoor cycling class? Your mind and body are preparing for the big task ahead! As the second trimester rolls around, you begin to do the 'heavy lifting'. The baby is growing and it soon becomes evident that your body is doing a lot of work. It is in high gear preparing for the baby who is rapidly growing. The second trimester can be seen as the bulk of the cardiovascular workout. Blood, sweat and tears. By the third trimester, you start to slow down (maybe even waddle a bit!) as you prepare for the end of your pregnancy. Just like the cool-down period of an indoor cycling class. Cue the relaxing music. It sure is needed in the last couple of weeks and minutes. Here are my top six lessons learned:
1. NAUSEA IS ALMOST CERTAIN. The majority of my girlfriends who are pregnant or have been pregnant can attest that nausea is almost certain. I was lucky...well, not really. I didn't realize that morning sickness isn't just in the morning. I had it most days, all day of weeks 7-15 of my pregnancy. It slowly declined as I grew bigger and bigger but some poor moms-to-be have it their whole pregnancy. What we put up with in pregnancy is also a common occurrence in an indoor cycling class. Start working in the anaerobic zone and you'd be sure to run into a bit of nausea. And in that situation too, we buckle down and pedal through it! Embrace your nausea! The reward at the end is worth it! 2. YOUR BODY IS AMAZING! As you are well aware, your body pushes the limits physiologically in an indoor cycling class. Pregnancy is no different except its working to make a healthy baby. Who knew I could teach indoor cycling classes to 36 weeks pregnant and ride my road bike on an indoor trainer a day before giving birth! And even more amazing is that after nine months of nesting in my body there is a healthy baby boy! Your body is amazing...and brilliant. Be kind to it. Listen to its cues (your body gives them!). Know your physiological limits and work within them. 3. GLOW AND SHINE. I like to think I glow when I ride. Have you ever heard of the saying - women glow, men perspire and horses sweat! This saying is thought to have originated from Victorian etiquette guides. And I am sure you've heard that pregnant women glow. Enjoy the glow! Even if you don't physically feel good, know that your glow (sweat) is apparent. Over the past four months I've been able to read bits and pieces about the indoor cycling world...during nap times and early morning feedings (got to love my iPhone!). Shannon Fable recently wrote a great review of what it takes to be an indoor cycling instructor. Take a peek at her blog post on the American Council of Exercise's Fitnovatives Blog.  To summarize, she highlights three main areas where to put your time and energy. Here's my brief input on each point.
1. Education Fitness leadership certification is essential to pursue when wanting to lead an indoor cycling class. In Alberta, the AFLCA is the leading certifying agency that top indoor cycling instructors go to for training. Also, the YMCA (a 'sister' to the AFLCA) provides quality education which can complement the certification requirements of the AFLCA designation. For additional certification and education, many of the indoor bike manufacturers/suppliers provide courses on how to teach indoor cycling classes such as Spinning™, Keiser, and Schwinn®. Most courses are offered outside of Canada but the rare one is available to take locally. 2. Slumdog Millionaire Vs Grease The focus of a good lesson plan (yes, I highly encourage a new lesson plan for each class!) is the HOW and the WHY. How are you leading participants in your class? Can you describe succinctly but with detail that you want participants to do? And then describe in basic terms why you want them to perform these certain drills? Shannon emphasizes the importance of content (i.e., drills and skills) rather than flashy, content poor "bells and whistles". 3. Success for Everyone Indoor cycling classes are appropriate for beginners, older adults, and athletes alike. The challenge is for the leader to adapt their planned workout for all those in attendance. How do you assess your participants and make sure their workout is appropriate? Shannon highlights the importance of coaching. Hands down - good coaching is essential to leading a group and having each individual participant be successful. Take some time to ponder Shannon's suggestions. They are key to hitting the mark as an indoor cycling instructor.  As comical as this above joke is, it really makes me think about spider webs as safety nets. What are the safety nets your facility uses or alternatively, what sort of safety nets do you put in place for yourself?
One of the many roles I have is an AFLCA Trainer of Leaders and I get to observe new AFLCA cycle designation candidates. Recently while observing a new instructor, she demonstrated great care and diligence. She had all participants complete an informed consent and a short medical history to inform her about any health concerns. Smart or what! What waiver does your facility use? Or do you have participants sign a waiver or what about informed consent? And then there are the physical activity readiness questionnaires, where do they fit in? Let’s review what each type of form will provide. Waiver: provide coverage for the facility and associated staff in case of an incident Informed Consent: form outlining the potential risks and benefits to participating in an exercise program PAR-Q: simple screening tool used for participants 15 to 69 years to determine if it is appropriate to start an exercise program PAR-MEDX: medical clearance form that must be provided to participants who answer questions positively on the PAR-Q. This form is completed by the participant’s physician. PAR-MEDX for pregnancy: medical clearance form that must be completed by all pregnant women by their physician before participating in exercise program These forms are all examples of safety nets. Ideally, having one or more of the forms completed by participants will demonstrate that you value your participants’ health and safety. As well, in some cases it may also protect you in an event of an incident. What other communications tools can you use to keep your participants safe? Do you ever ask who is a new participant at the beginning of class or inquire with participants about anyone have any medical conditions you should be aware of? These types of questions can provide some valuable verbal information about who is participating in your class and better enabling you to provide an appropriate class (i.e., suitable intensity, drill types, etc.). It is just another way to avoid having any incidents during your class. In the past couple years, “safety nets” have become more common such that U of A Campus Recreation program has now implemented waivers for all participants who partake in group fitness classes. Take a look at their form for an example. What are the ways you protect your participants and yourself in your indoor cycling classes? What is your “spider web”? I am very fortunate with my work as an AFLCA Trainer of Fitness Leader to meet both new and veteran indoor cycling instructors. In my most recent AFLCA Cycle Designation Course, one such participant shared with me a recent article she wrote. Lisa Wojna is a journalist with a fitness column in the Leduc Representative and she shared with me (and now you) this great article on visualization. Take a read and get inspired! Visualize your way to a healthier you |
Workman's Cycle Drills & Skills
Enjoy some of my favorite cycle workout drills either in a cycle class or on your own bike at home! Archives
September 2013
Categories
All
|

 RSS Feed