|
Scanning the internet, books and previous conference notes, reminds me of the many options on setting up indoor cycling bikes for a class. I was working on my PowerPoint slides for the AFLCA cycle designation course I taught today and wanted to dive deeper into the nuts and bolts of set-up. I came across this YouTube video, produce by Star Trac, the bike company that I typically use when I teach. It is very comprehensive and covers the majority of the points needed to set-up the bike. As a quick review, here are some key points: 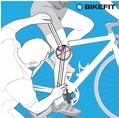 Saddle Height: A crude estimate can be determined by lining up the saddle with hip bone (top of the iliac crest) or the crease of the flexed hip. I usually have participants sit in the saddle and complete a few revolutions while watching if the hips are rocking excessively. When the foot is extended the knee should be slightly bent, which really means the knee angle is approximately 25-35 degrees. Using a goniometer to measure this angle can be very helpful. Handle Bar Height: As I mentioned in a previous post, hamstring flexibility can help set the handle bar height. Have participants lean forward to the handle bars and set the height at a 45 degree angle from their hips. Beginners are looking for comfort so usually I have them place handle bars at the same height as the saddle. Whereas your experienced or more flexible riders will likely prefer a lower setting for height. Saddle Forward (fore) or Back (aft): Setting this position helps determine the placement of the knee over the pedal. This is where I find there are varying ideas of how to set up the ideal position. If the goal is efficiency and maximal force transfer from the foot to the pedal, participants will want to have the knee positioned directly above the pedal axel. By using a plumb line, there are two current thoughts on what to do: 1. Use a plumb line from superolateral patella/knee to the pedal axel, or 2. use a plumb line from mid-line of patella/knee to line up with the end of the crank arm. To determine the position with either option, look at participant’s leg and imagine a straight line from the knee to pedal axel. If the plumb line is forward (/) over the pedal axel (option 1) or end of crank arm (option 2), the seat needs to be moved backward. Conversely, if the line is backward (\) from the pedal axel (option 1) or end of crank arm (option 2), the seat needs to be moved forward. Handle Bar Forward (fore) or Back (aft): Position will vary due to different torso lengths of participants. By a visual assessment, determine if participant is too far forward to reach the handle bars or too cramped (i.e., elbows hugging body) in their body position. Participants will typically self select the position for comfort. Final Assessment: After all four (or three depending on the bike) variables are set, re-check angle at the knee with goniometer and take long plumb line string and draw a straight line from the hip to the crank to the axel. If there is alignment with all three points on the participant’s body, they are set to ride! For other reviews and/or suggestions on bike set-up, here is a sample of other recommended YouTube videos!
6 Comments
With the holiday season upon us, how can we incorporate the festive season into our indoor cycle class? The simple answer would be to include holiday music in our mix of songs. Many of the big fitness music suppliers have seasonal music set to the 32 count, such as Power Music, Dynamix Music, and Yes! Fitness Music. But, is there a more creative way to get your cycle participants into the holiday spirit? Since we always begin with a warm-up, let’s start there! Get your reindeer antlers on!  Picture courtesy of Microsoft clipart Set the scene for your cycle participants by indicating they are one of Santa’s reindeer (now it is time to imagine!) and it is a snowy Christmas Eve pulling Santa’s sleigh around the world. Have cycle participants get themselves set to a moderate tension in a seated position to start. Here are some suggested ways to get cycle participants warming up: 1. To avoid clouds, cue participates to add tension and stand up into a standing hover position while they dodge clouds (slide upper body from side to side). 2. To land on rooftops, cue participants to sit down on the saddle while they add tension and sit back as if the reins are being pulled back. 3. To drop presents from the sky, cue participants to sit down and set tension low as if descending quickly over rooftops (similar to a downhill ride). 4. It’s close to the end of the night and Santa needs to go faster, cue participants to perform a seated sprint. Use a combination of the above suggestions and/or makes up your own version of what reindeer would need to do to get Santa around the world on Christmas Eve! Nothing says the holiday spirit than giving. Consider gathering donations (food for the Food Bank, toys for Santa’s Anonymous or money for the Salvation Army) from your cycle participants. Just double check with your venue to ensure this is something they are okay with. And maybe next year plan for a donation drive for the whole month of December. Wishing you the best of the season, Merry Christmas! -Lisa  It feels like my wheels are still spinning after a great weekend at the Provincial Fitness Unit’s Fit Rendezvous. I find that attending conferences sets in motion new creative ideas to bring back to your classes. With volunteering, I was able to observe Lisa Kingston’s Endurance and Extreme Training session and that is the inspiration for my warm-up drill below.
Dynamic warm-ups prepare cycle participants for the workout ahead, particularly if the planned workout is of increased intensity. It helps participants increase blood flow to their working muscles by increasing cardiac output (heart rate and stroke volume). Mentally, participants are engaged from the start. They are forced to focus from the very beginning! Have cycle participants set their tension at a steady state, moderate intensity with a cadence between ~80-88 rpm. When everyone has settled into that cadence, prompt cycle participants to: 1) Increase to ~100 rpm while they stay seated for 10 seconds 2) Then slow leg cadence back to ~80-88 rpm for 20 seconds 3) Repeat up to four to six times Now that cycle participants have become used to sitting with quick cadence, have cycle participants add resistance to the fly wheel and stand on their pedals. Maintain cadence at ~80-88 rpm while standing. Body position should have hips slightly set back so knees are directly above the pedal axle. Again when everyone has settled in, prompt cycle participants to: 1) Increase cadence to ~100 rpm while they stay standing for 10 seconds 2) Slow leg cadence back to ~80-88 rpm for 20 seconds 3) Repeat up to four to six times By starting with some cadence work at the beginning of the workout, it will enable participants to be ‘quick on their feet’ for the rest of the ride. Not sure when my post-conference high will slow my wheels down. Enjoy the ride! |
Workman's Cycle Drills & Skills
Enjoy some of my favorite cycle workout drills either in a cycle class or on your own bike at home! Archives
September 2013
Categories
All
|
 RSS Feed