|
Have you ever attended an indoor cycling class where someone was wearing a wig, or a tiara, or even a cape? Well, I have and I encouraged it! Yes folks, it's that time of year again when adults get to play dress up, at least in my classes, and we play Thriller by MJ for the whole class! What will you do with your class this year? Here's one idea (want more ideas? Check out my previous posts here and here on Halloween games) using homemade Trick or Treat cards. This is an easy way to incorporate “tricks” (i.e., challenging drills) and “treats” (i.e., easier drills). Simply have participants pick a card, either trick or treat, and the predetermined drill assigned to that card will dictate what drill is performed. I’ve decided to have six possible tricks and three possible treats. Possible Tricks: 1. Two minutes of jumps with 30 second break; repeat two to three times 2. Two one minute standing hill climbs and a couple two minute standing hill climbs; 15 second recovery between each climb 3. Five one minute sprints with 30 seconds recovery between each sprint 4. 15 squats off the bike followed by one minute of seated hill climb; repeat two times (be watchful of participants’ footwear particularly if they are wearing cycling cleats) 5. 10 sprints for 15 seconds. Recover for 45 seconds. 6. Attack the pack power! Six intervals of seated power for 30 seconds, recover for 30 seconds Possible Treats: 1. Standing jog/ride for two minutes 2. Meet your neighbor spin out. Participants discuss best and worst Halloween costume they ever wore for three minutes. 3. Steady time trial pace for six minutes singing to the song everyone knows the words to, Thriller (the album version is 5:58) After you've constructed your family’s costumes and your Halloween decorations, it's easy to whip up these trick or treat cards. Here's how I did it: Step one: collect crafty items such orange post-it notes, black card stock, "trick" (6) and "treat" (3) labels, and fun Halloween pictures or stickers. 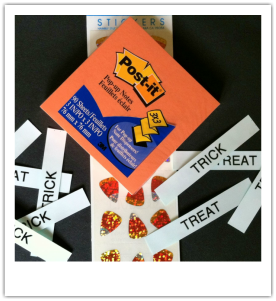
1 Comment
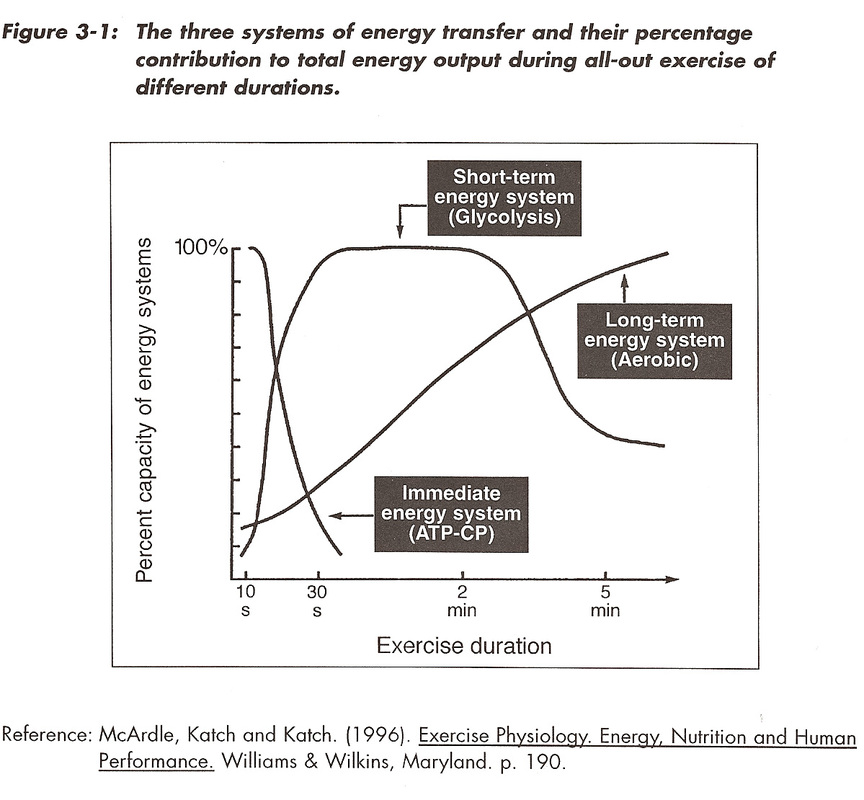 In my previous post on using the energy systems in your indoor cycling class, I discussed the aerobic energy system and provided a drill that would challenge your participants’ aerobic power. Now continuing down the list of energy systems most used in spin, the focus shifts to the first of the two anaerobic, or short duration, energy systems. This post will focus on the anaerobic lactic (also called glycolytic) system.
Here’s a quick refresher on the energy system and how we should focus our drills to use it effectively. The anaerobic energy systems are the systems in which oxygen is not required to make energy. They are what fuels our initial movements when we start exercising and they are what work extensively at high intensities. The anaerobic lactic energy system, specifically, is able to generate small amounts of ATP but is also relatively faster at making energy compared to the aerobic energy system. This also holds true for the anaerobic alactic system, the quickest system, which will be the focus of the third and final post on this topic. As stated in my previous post, it takes the aerobic system time to generate energy and so the body uses anaerobic glycolysis to make energy within the first couple minutes of exercise. Put more simply, instead of using oxygen within the cells to generate energy, it is able to produce ATP via a cascade of chemical reactions. The problem with this energy system is the by-product it produces, namely lactic acid, which breaks down into excess hydrogen ions and increases the acidity of the working muscle cells. Why is that a problem? Well, increased acidity causes stimulation of the nerve endings causing pain, decreased muscle contraction and fatigue. Performance suffers! Kind of like hitting a brick wall! When these by-products are accumulating in the body, the tipping point for a lack of a better word is called anaerobic threshold (also closely related and referred to in the literature as lactate threshold and/or ventilator threshold). Without going through the gory details, it is sufficient to say that by training close this anaerobic threshold, we can improve our performance. So how do we apply our knowledge of the anaerobic lactic energy system and anaerobic threshold to our drills? Well, let’s look at the appropriate work to rest ratio, the time it takes our bodies to recovery from anaerobic work. For anaerobic lactic work, we must design sessions with the ratio 1:2 to allow the muscles to recovery and remove (as much as they can) the nasty by-products. Typically, this energy system kicks in at around 15 seconds out to about 120 seconds. Power drills work very well with the anaerobic lactic energy system. By incorporating multiple groups in the drill, you can build in the appropriate recovery for each participant. Let’s take a look on how to set this up. 
Hockey you say? But it is June! The biggest night in Canadian sports happened on June 11 where the LA Kings won the Stanley Cup! This is the first time in their team’s franchise history. It was a blow out after the first period power play that lasted five minutes after a New Jersey Devil’s major misconduct. During the Kings’ power play, they scored three goals and set the tone of the game, taking them to victory. We sure love our game, so I'm dedicating this post to all hockey fans!
What would you do for a hockey inspired workout? Do you train hockey players on the bike? The bike is one of the best places to cross-train for our rink loving, hard hitting, puck shooting athletes. If you are not familiar with the game, here are the basics. With the exception of the goalie, each player plays the game in short bursts or "shifts" of players who are on "lines" consisting of defensemen and forward. At any time on the ice, there are two wingers, a centremen and two defensemen. Although some players are in more offensive and defensive roles, the key to victory is playing as a unit, both in the offensive zone (trying to score a goal) and in the defensive zone (trying to avoid a goal scored on their goalie)...meaning each player needs to constantly keep skating to stay with the play. Each shift typically last for about 45 seconds followed by recovery on the bench for a slightly longer period of time (i.e., 90 seconds). For this drill, to keep things moving I’m replicating a team with three forward lines; thus the recovery is two times the work. For a basic hockey inspired drills, try the following two drills: 1. A regular offensive shift: 45 second interval with 90 second recovery 2. An extended defensive shift defending a power play: 60 second interval with 2 minute recovery For more advanced drills, try the following: 1. A extended defensive shift capitalizing on a power play: 60 second interval including two 15 second “surges” with 2 minute recovery 2. A extended offensive shift capitalizing on a power play: 60 second interval including one 30 second “surge” with 2 minute recovery Have participants maintain their cadence between 80-100 rpm and up the resistance to mimic a RPE of 8-9/10 for the 45 or 60 seconds of work. For the recovery, reduce resistance and ride at a comfortable pace (RPE = 5/10). Surges are increased cadence and resistance for more challenge, which can be thought of as power and acceleration on the ice. Repeat each drill up to 4-6 times With hockey season wrapped up for the year, you may find athletes ready for off season training in your classes. But why not also let your regular participants explore the feeling of a hockey shift by working them hard during an indoor cycling session. With the NHL draft just wrapping up, it’s the perfect time to start thinking about training for next year. And as a side note, I was quite happy with the outcome on June 11! Way to go Jarret Stoll! Want to ‘pump’kin your cycle participants up with your creepy and frightening class? Try some of these drills and skills this Halloween! Ghostbuster Hill Drill Did you know that the word “ghost” is sung 30 times in the original Ghostbusters motion picture soundtrack song? Why not use this to your advantage and have your cycle participants increase resistance every time they hear the word “ghost”. Now for those who have a tension knob, participants can increase with small increments in the seated position each time they hear the word and stand when their revolutions drop below 50 rpm for a standing hill climb. For those with gears, why not have cycle participants climb two hills increasing from gear 5 to gear 20 (move to standing to reach the top of the hill), with 30 words, these lucky folks get a break dropping back to 5 before climbing again (apparently this hill has a dip near the top!). Both ways, the hill is just over four minutes total and I would encourage adding in downhill at the end to another classic Halloween song, Monster Mash! 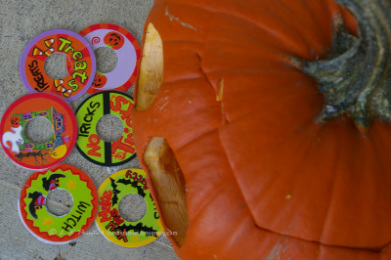 R.I.P. Power I found these really wicked Halloween glass tags with six themes – Trick, Treat, Bats, Witch, Haunted House, and Jack o'lantern (see above). I laminated them, place them on each bike and use them to perfectly divide participants into six groups. Power work has been a focus this term and thus, R.I.P. Power is the perfect way to put cycle participants into the grave! Split the group into 2 groups (Group 1: Trick, Treat, and Bats; Group 2: Witch, Haunted House, and Jack o'lantern). Group 1 start with seated power for 15 seconds while Group 2 rests. After the 15 seconds, the groups switch where it is Group 2’s turn to go. Continue to switch groups while increasing the duration of the seated power (i.e., 30, 45, 60, 90 seconds). If time permits, start again and steadily increase in duration with standing power. Need more inspiration? Check out October 2010’s post for another drill idea for sprints! Happy Halloween!
I like to have cycle participants engage with one another, particularly when they are in a registered class. It is nice to make the group feel more like a community rather than separate individuals coming to a single fitness class. It is actually part of my role with Campus Recreation at the University of Alberta to promote community. Their mission speaks about it loud and clear: “To create a sense of community through quality recreation programs at the University of Alberta and in the community beyond the University”.
Thus, I like partner drills. This drill truly is a balancing act between the partners as they are required to complete a power drill that is short but also try to ensure their partner has adequate rest time as well. Let me explain... Partners are required to maintain a power drill for a total of three minutes between them. As we know, power drills are intense and tap into the anaerobic lactic energy system. Each partner takes a turn completing the work while the other partner takes a recovery ride. As power is intense work, each partner may only be able to maintain the drill for say 60 seconds at which point they signal to their partner that it’s time to switch. Over the three minute period, partners may swap up to three or four times depending on each others’ physical fitness ability. So how do you cue this Lisa? Well, I typically count out the time in 15 second blocks. This allows participants to complete their part of the drill in 15 second increments (i.e., 15 seconds, 30 seconds, 45 seconds). Now, for your beginner groups, try two minutes to start and slowly increase the duration as the class progresses. And for your advanced riders, try five minutes. Be sure to explain that they are working with a partner and they may need to take up the slack at times when their partner needs an active recovery. Feel free to use seated power work and standing power work for this drill. It is nice to hear cycle participants interact on the bikes. I enjoy hearing the giggles, groans, and high fives as they connect with a fellow cycle participant.  Aren’t the Olympics inspiring! The drive and determination of the athletes is untouchable! And what about TWO Olympic Gold Medals in hockey!
I am very fortunate to have trained the University of Alberta’s Pandas Hockey team on the bike. Talk about dedicated athletes! They hoot and holler and push themselves to the limit just like our Olympic athletes. Here is a hockey inspired drill that I use when they are on the bikes. Start by splitting the group into three groups. 1. Defense 2. Wingers 3. Goalies and Centres Group 1 participants/players work hard (i.e., 100% effort) for 30 seconds pounding the pedals just like a shift in hockey. The other two groups recover for 60 seconds just like sitting on the bench waiting for their next shift. Group 2 follows with their 30 seconds followed by Group 3. The work to rest ratio is 1:2. Resistance and cadence should match Power drills. And rest between each stage of the drill should be between 2-5 minutes. Stage One (6 minutes): Each group completes Seated Power for 30 seconds X4 Stage Two (6 minutes): Each group completes Standing Power for 30 seconds X4 Stage Three (9 minutes): Each group completes Seated Power for 45 seconds X4 Stage Four (9 minutes): Each group completes Standing Power for 45 seconds X4 For each player, this would equal 16 shifts on the ice, which is close to the number of shifts a player would play in a typical game. Depending on participants’/players’ fitness level, adding or removing a stage may be necessary. If you want to train like a world class hockey player, try this drill out! As an Edmontonian, I am fascinated by the 'diehard' cyclists who ride their bikes in four feet of snow and minus 30 degree weather. Now those people are true Canadian cyclists! I dabbled in winter riding back in 2007; lots of fresh powder to fish tail through and the feeling you get of frozen snow on your tires. This drill reminds of those cold, power driven rides! Power Through the Snow! Power drill refresher: Increased resistance and increased cadence equals power. It is a fine line between too much added resistance and too many revolutions. Keep in mind that power drills are short in duration (15-60 seconds) and are tapping into the anaerobic energy system (aka the hard, intense work!). The drill includes seated power and standing power (hint: ensure you add additional resistance when you stand up!)  Seated power for 15 seconds Standing power for 15 seconds Recovery for 60 seconds Repeat four times. Standing power for 15 seconds Seated power for 15 seconds Recovery for 60 seconds Repeat four times. As you and your cycle participants get more fit and strong, increase the duration of the power (as recommended above) and recovery time and/or increase the number of repetitions. Ensure to keep the duration with a 1:2 work to active recovery ratio. This drill reminds me of winter riding because the snow and ice builds up on your tires adding resistance and you need to POWER through the deep snow. Now – are you ready to ride in the snow??? Picture courtsey of:
www.bikingsociety.com/blog The song title is fitting for the time of year we are moving into - WINTER. This cycle drill is more suited to mid to advanced cycle participants. Using the song "Wizards in Winter" a combination of sprints and power (increased resistance and cadence) can be timed to coincide with the instruments used. Set resistance at moderate or slightly higher to get your best sprint work/small recovery tension. Power (either seated or standing) requires participants to up the resistance and maintain increased cadence. Get ready for a 3 minute ride of your life! Intro (12 s) Sprint (5-6 s); 100+ rpm Quick break (2- 8s) ; 80-90 rpm Repeat three more times to the intense synthesizer playing Break (8 s) Power (20 s) to the slow guitar playing Break (6-8 s) Sprint (5-6 s); 100+ rpm Quick break (2- 8s) ; 80-90 rpm Repeat one more time to the intense guitar/playing Power (25 s) to the slow guitar playing Break (6-8 s) Sprint (5-6 s); 100+ rpm Quick break (2- 8s) ; 80-90 rpm Repeat one more time to the intense violin playing Sprint (15 s) Power Finish (18-20 s) Wizards in Winter Trans-Siberian Orchestra |
Workman's Cycle Drills & Skills
Enjoy some of my favorite cycle workout drills either in a cycle class or on your own bike at home! Archives
September 2013
Categories
All
|
 RSS Feed